FACIAL RECOGNITION WITH ESP32CAM
- Carlos Orozco
- May 16, 2022
- 4 min read
In this post, we will see how to use Eigenfaces, Fisherfaces and local binary pattern histograms to perform face recognition in Python using OpenCV and ESP32CAM.
To perform facial recognition, we must first collect data, which includes the faces of the people we want to recognize, then train the classifier, and then test it.
The goal of this post is to provide the processes and code needed to test this application yourself, so I'll leave you with the three programs we'll cover today and in the future.
Preparing Arduino IDE
The ESP32-CAM is a so-called "all-in-one" gadget. Two more possibilities have been added to the GPIO pins, in addition to the default Wi-Fi and Bluetooth connectivity. It features a small video camera built in as well as a MicroSD card slot for storing images and videos.
We’ll program the ESP32 board using Arduino IDE, so make sure you have them installed in your Arduino IDE.
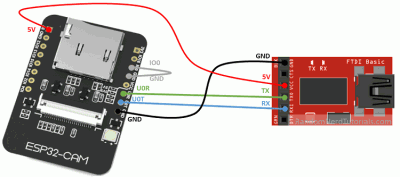
From the physical point of view, you have to power the device using the 5v and GND pins of the programmer, interconnect the UOR-TX and OUT-RX ports, and to start the device in recording format, jumper the GPIO0 and the GND of the plate itself. Once connected in this way, you can connect the programmer to the PC, and start the firmware upload.
Code
Copy the following code the Arduino IDE. Do not forget to enter your Wi-Fi and password.
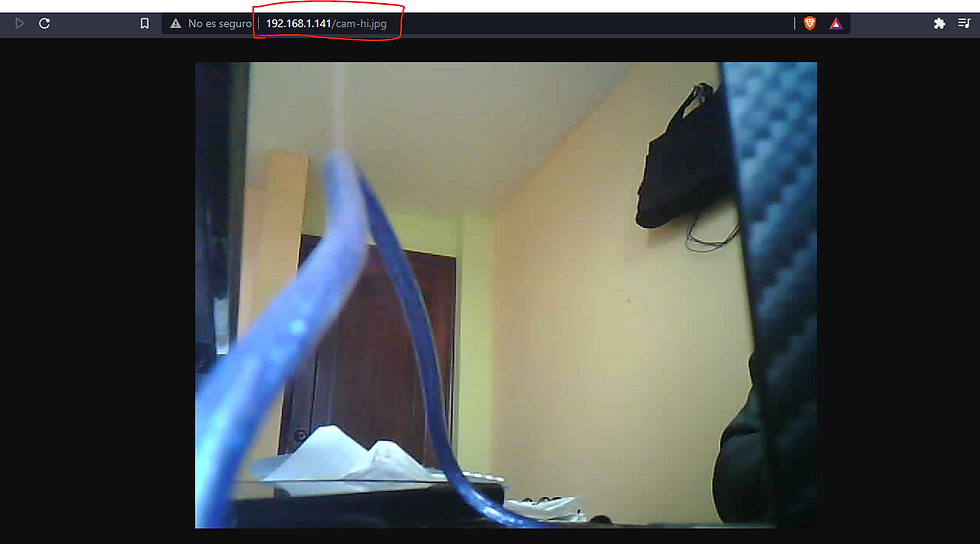
Go to your browser and see the ip of the camera and then use it in python.
Once the esp32cam is configured, we will start with the facial recognition code, for which we will use python, for which we will follow the following steps:
Creating the face database
We'll need the faces of the people we wish to recognize in order to do facial recognition. These faces should convey a range of emotions, including happiness, sadness, boredom, and surprise. Another feature that these photographs must include is a range of lighting settings, regardless of whether people are wearing glasses or not, and whether they close their eyes or blink.
These photographs should be taken in the same location or situation where facial recognition will be used. All of these different images derived from faces will help to improve the performance of the algorithms we use today (and, of course, as you gain expertise, you will be able to add or remove some of the conditions I've listed).
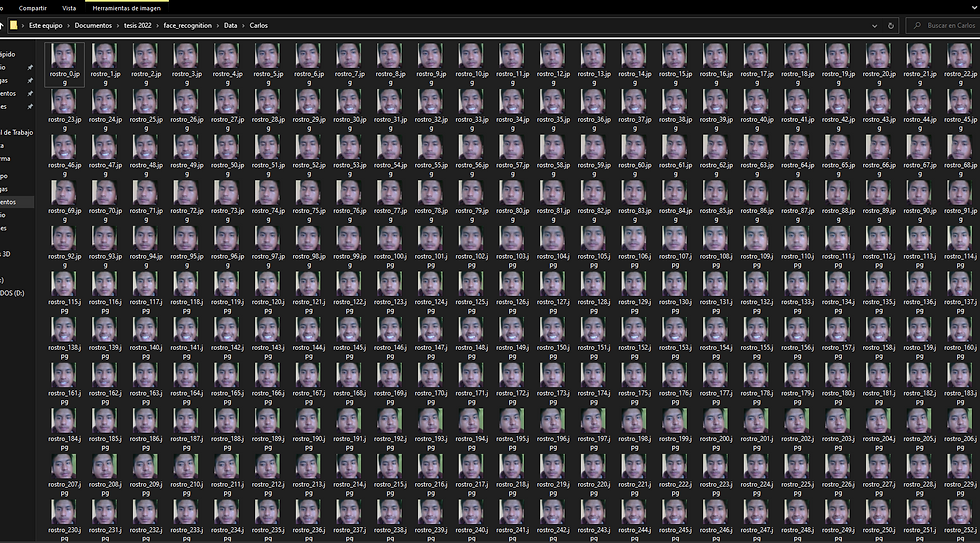
Let's look at the code. In this program, capturingFaces.py, 300 faces will be stored automatically when a movie is played.
Here you can see 300 captured images
Getting the data ready for training
Before beginning the training, make sure that each of the photographs has a label that corresponds to the individual whose face it is. As a result, when we read the folder 'Person 1', all of those photographs will be allocated label 0, then all of the faces of 'Person 2' will be assigned 1, and so on. We'll tell the computer that the photographs belong to separate persons with each of these labels.
Then, in a script named trainingRF.py, we'll set up this process, including the images and labels, so that we may train them with Eigenfaces, fisherfaces, and Local Binary Patterns Histograms.
Recognizer Training
We are going to briefly talk about Eigenfaces, fisherfaces and Local Binary Patterns Histograms before moving on to the training.
I recommend that you visit the OpenCV documentation on these methods: https://docs.opencv.org/4.2.0/da/d60/tutorial_face_main.html#tutorial_face_eigenfaces
Eigenfaces
This employs the PCA (Principal Component Analysis) method, what the OpenCV documentation tells us is: 'The idea is that a high-dimensional dataset is often described by correlated variables and thus only a few dimensions significant explain most of the information.'
Eigenfaces in OpenCV, cv2.face.EigenFaceRecognizer_create()
For this method we will use cv2.face.EigenFaceRecognizer_create(). We could give it parameters, however in this tutorial we will leave it empty, but if you are interested in knowing more about these you can visit this link with its documentation.
There are some considerations when we are going to use this method:
The training and prediction images must be in grayscale.
The eigenfaces method assumes that all images, whether training or test, must have the same size.
Fisherfaces
This method is an improvement on the previous one.
Fisherfaces in OpenCV, cv2.face.FisherFaceRecognizer_create()
Like the previous method, I will leave the link to this function so that you can delve into it if necessary.
Considerations:
The training and prediction images must be in grayscale.
The eigenfaces method assumes that all images, whether training or test, must have the same size.
Local Binary Patterns Histograms
LBPH (Local Binary Pattern Histograms) presents improvements over previous methods, as it is more robust to changes in lighting. Also, quoting the OpenCV documentation: 'The idea is not to look at the whole image as a high-dimensional vector, but to describe only the local features of an object'.
LBPH in OpenCV, cv2.face.LBPHFaceRecognizer_create()
For this function you can use different parameters such as radius, neighbors, grid_x, grid_y and threshold, for more information about these you can go to this link.
Considerations:
The training and prediction images must be in grayscale.
There are no specifications on the size of the images corresponding to the faces. Therefore we assume that they can have different sizes.
Real-time facial recognition
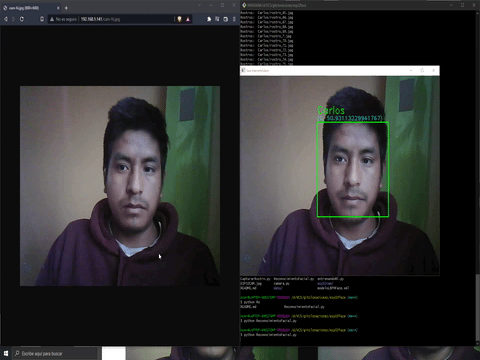
Now that we've made it this far, it's time to put our knowledge to the test. FaceRecognition.py will be the name of the script. The procedure that we will follow, as well as the training, will help us with the three methods (separately). Let's see:
Once the model is obtained, let's try the recognition to see how it goes:
Conclusion
To improve facial recognition you could increase the number of samples captured by the camera, initially it has 300 samples and you could increase this number depending on the characteristics of your computer for data processing.
The complete code can be found on my github.


Comments